Using clay slip molds means pouring liquid casting slip into a plaster mold, letting the plaster draw out water to build a wall of clay against the mold surface, then pouring off the excess slip once the wall reaches the right thickness before demolding the piece once it firms up.
Slip casting looks close to magic the first time you watch it happen. A jug of liquid clay goes into a plaster mold, and twenty minutes later a perfectly formed, even-walled piece comes out the other side, ready to trim and dry.
At Le Studio Art Space, slip casting molds get pulled out regularly for members wanting consistent, repeatable pieces, whether that’s a run of matching mugs or a single detailed figurine that would be genuinely difficult to hand build.
This guide walks through the actual process of using clay slip molds step by step, from what you need before you start to the small judgment calls that make the difference between a clean piece and a cracked one.
What You Need Before Starting
You need a plaster slip casting mold, a batch of casting slip mixed to the right consistency, a soft natural sponge, a rubber band or mold straps if your mold comes in multiple parts, and a clean, flat, level surface to work on.
Casting slip itself is different from throwing clay. It’s a deflocculated liquid clay body, meaning it’s been chemically thinned so it pours easily while still holding a relatively high clay content, and it’s worth buying a slip specifically formulated for casting rather than trying to thin down a regular clay body yourself.
Check your mold for any old plaster dust, chips, or debris in the cavity before you start, since anything loose in there will end up pressed into the surface of your finished piece.
Have a jug or pouring vessel ready that lets you pour smoothly and in one continuous motion, because starting and stopping the pour partway through is one of the more common causes of visible seam lines on a finished piece.
It also helps to have a small offcut of the same slip batch set aside so you can check its consistency before committing to a full pour, since slip that’s been sitting for a while can settle and thicken slightly at the bottom of its container and needs a good stir before use.
Pouring The Slip Into The Mold
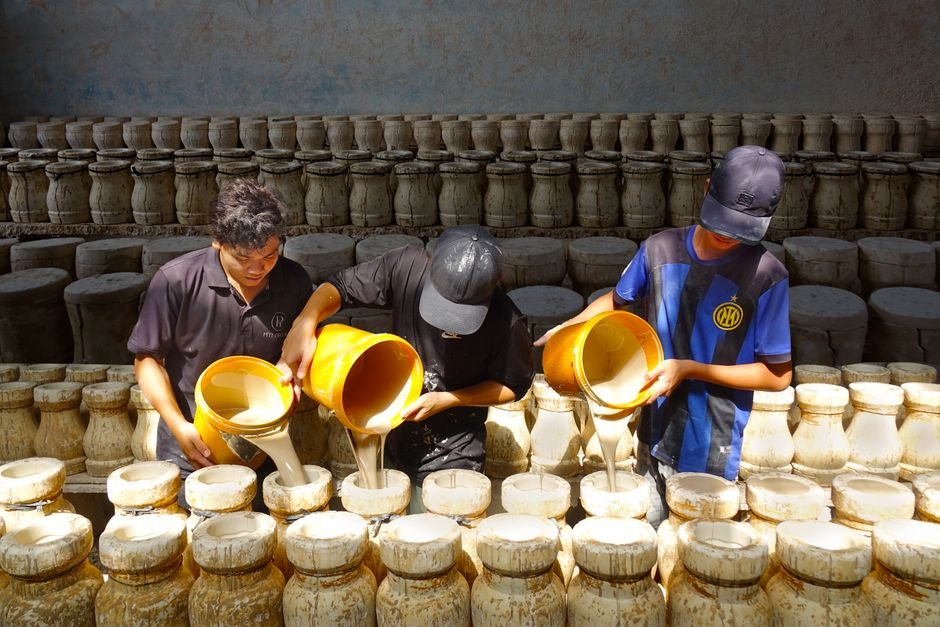
Pour the slip in a slow, steady stream aimed at one side of the mold’s fill hole rather than straight down the middle, letting it rise gradually and pushing air ahead of it rather than trapping bubbles against the mold wall.
Fill the mold completely to the top of the pour hole in one continuous pour. Stopping halfway through introduces a visible ring where the slip level paused, and it also gives the plaster time to start drawing water unevenly before the mold is properly full.
As the plaster absorbs water from the slip nearest the mold wall, the level in the pour hole will drop noticeably within the first few minutes, so top it back up to keep the mold full for as long as you want the wall to keep building.
Gently tapping the side of the mold a few times right after pouring helps dislodge any small air bubbles clinging to the mold wall before they get trapped in the developing clay layer.
Timing The Casting Correctly
The plaster mold draws water out of the slip that’s touching it, building a wall of firmer clay against the mold surface while the slip in the middle stays liquid, and that wall keeps thickening the longer the slip sits in the mold.
Check wall thickness by watching the level in the pour hole drop and, once you judge it close, gently scratching a small test area near the rim with a tool to see how thick the built-up clay layer actually is before committing to pouring out.
Once the wall reaches your target thickness, usually somewhere around 5 to 10 millimetres for a functional piece like a mug or bowl depending on its size, pour the remaining liquid slip back out of the mold in one smooth motion.
Prop the mold upside down or at an angle afterward so any last dripping slip continues to drain away from the piece rather than pooling and adding extra thickness at the bottom.
Releasing And Cleaning Up The Piece
Leave the piece in the mold until it firms up enough to hold its shape and shrinks slightly away from the plaster walls, which you’ll usually notice as a visible gap appearing at the rim or seams.
Open multi-part molds carefully and evenly, releasing any straps or bands gradually rather than all at once, so uneven pressure doesn’t distort a piece that’s still relatively soft.
While the clay is still soft enough to work but firm enough to hold together, gently clean up any visible seam lines with a damp sponge or a soft rib, working with light pressure so you don’t smear or thin the wall in that spot.
Trim any excess clay from the pour hole opening at this stage too, since it’s far easier to clean up a soft seam now than to sand or carve it away once the piece has fully dried.
What Competing Guides Leave Out
Most general guides describe the pour and demold but skip over how differently timing works between a small mold and a larger one, and a large platter or vase mold can genuinely take two to three times longer to build an equivalent wall thickness than a small mug mold, simply because there’s more surface area drawing water at a similar rate.
What to actually do if a piece sticks is another gap. Gently reintroducing a small amount of water around the stuck edge with a wet sponge and waiting a few minutes before trying again works far more reliably than forcing the mold open, which risks chipping the plaster or cracking the piece.
Cracking during release is usually a sign the piece was left too long and shrank more than the mold could accommodate, so if you’re seeing repeated cracks at the same spot, shortening your casting time slightly on the next attempt is worth trying before assuming the mold itself is the problem.
Few guides also mention that a brand new plaster mold absorbs water noticeably faster on its first few uses than it will once it’s been used regularly, so your very first casting time with a new mold is not a reliable guide for future attempts.

Common Mistakes When Using Slip Molds
Overfilling and forgetting to top up the pour hole is one of the most common early mistakes, since a mold left to sit without topping up ends up with a visibly thinner, weaker wall near the top than at the bottom.
Rushing the demold before the piece has properly firmed and shrunk away from the mold walls is another frequent issue, and it usually results in a distorted rim or a piece that tears rather than releasing cleanly.
Uneven wall thickness, often caused by pouring too quickly or at an angle that sends slip unevenly around the mold cavity, shows up later as warping or cracking during the bisque firing, well after it’s too late to fix.
Many potters also find that skipping the seam cleanup step while the clay is still soft leads to noticeably more sanding work later, since dried clay is much harder to smooth without risking chips or cracks along that same seam.
Want to try slip casting hands-on rather than just reading about it? Come use the molds and casting slip in the ceramic studio at Le Studio Art Space in Mordialloc, or ask about a session that walks you through your first pour.
Frequently Asked Questions
Is slip casting hard to learn as a total beginner?
Not really. The pour and timing take a little practice to judge by feel, but many potters find slip casting is actually more forgiving for a first attempt at a symmetrical, even-walled piece than throwing on the wheel.
What if my piece cracks every time I demold it?
That’s usually a sign the piece is being left in the mold too long and shrinking more than the plaster can accommodate, so try shortening your casting time slightly and see if that resolves it.
Can I reuse the slip I pour back out of the mold?
Yes, poured-off slip can generally be reused for another casting, though it’s worth straining it first to catch any stray bits of plaster or debris before pouring it again.
How many times can I actually use the same plaster mold?
It varies by mold size and how carefully it’s handled, but most studio molds are good for dozens to a few hundred castings before the plaster wears down enough to noticeably slow absorption.
Do I need special equipment to try this, or can I just use a regular mold?
You need a mold specifically made for slip casting, along with casting slip rather than regular throwing clay, but beyond that the setup is genuinely accessible, and Le Studio Art Space has molds and slip on hand for members wanting to try it.
This article is provided for general educational purposes by Le Studio Art Space and reflects common studio practice.